Introduction to Docker
https://www.youtube.com/watch?v=Q5POuMHxW-0
http://www.slideshare.net/dotCloud/docker-intro-november
Source Code:
https://github.com/dotcloud/docker
Docker: Fundamentals & OpenStack Integration
https://www.youtube.com/watch?v=jEcousZ6xBU
Slides : http://www.slideshare.net/ewindisch/docker-open-stack-32865996
https://wiki.openstack.org/wiki/Docker
Docker
http://en.wikipedia.org/wiki/Docker_(software)
LXC
http://en.wikipedia.org/wiki/LXC
Cgroups
http://en.wikipedia.org/wiki/Cgroups
The Linux kernel provides cgroups (2006) for resource isolation (CPU, memory, block I/O, network, etc.) that do not require starting any virtual machines. The kernel also provides namespaces to completely isolate an application's view of the operating environment, including process trees, network, user ids and mounted file systems. LXC (LinuX Containers) combines cgroups and namespace support to provide an isolated environment for applications; Docker is built on top of LXC, enabling image management and deployment services.
Demo at OpenStack Summit HK (live demo to nova boot a docker container was not successful)
https://www.youtube.com/watch?v=do4qrdCu1T8
Slides : http://www.slideshare.net/dotCloud/openstack-summit-hk-2013
Docker manages kernel features
Uses cgroups to contain processes
Uses namespaces to contain networks
Uses copy-on-write filesystems to build images
Docker makes scripting distributed systems easy
Friday, June 27, 2014
Thursday, June 26, 2014
OpenStack : Swift : Create container and upload test file
Here I create a container called cont01
$ swift post cont01
Dashboard will show the container information

Now I try upload a test file
$ swift upload cont01 test.txt
Now it shows

$ mv test.txt test.txt.bak
$ swift download cont01 test.txt
test.txt [auth 0.164s, headers 0.205s, total 0.205s, 0.000 MB/s]
$ ls -al test*
-rw-rw-r--. 1 openstack openstack 6 Jun 26 11:33 test.txt
-rw-rw-r--. 1 openstack openstack 6 Jun 26 11:33 test.txt.bak
I noticed that the file permission and timestamps are preserved.
$ swift post cont01
Dashboard will show the container information
Now I try upload a test file
$ swift upload cont01 test.txt
Now it shows
- Object Count: 1
- Size: 6 bytes
$ mv test.txt test.txt.bak
$ swift download cont01 test.txt
test.txt [auth 0.164s, headers 0.205s, total 0.205s, 0.000 MB/s]
$ ls -al test*
-rw-rw-r--. 1 openstack openstack 6 Jun 26 11:33 test.txt
-rw-rw-r--. 1 openstack openstack 6 Jun 26 11:33 test.txt.bak
I noticed that the file permission and timestamps are preserved.
Wednesday, June 25, 2014
OpenStack : Swift : restart swift
When I clicked container at OpenStack dashboard, I got the following error

I tried run debug option with swift command
$ swift --debug list
DEBUG:keystoneclient.session:REQ: curl -i -X POST http://192.168.1.188:5000/v2.0/tokens -H "Content-Type: application/json" -H "Accept: application/json" -H "User-Agent: python-keystoneclient" -d '{"auth": {"tenantName": "admin",
:
:
:
:
:
:
:
INFO:urllib3.connectionpool:Starting new HTTP connection (1): 192.168.1.188
INFO:urllib3.connectionpool:Starting new HTTP connection (1): 192.168.1.188
INFO:urllib3.connectionpool:Starting new HTTP connection (1): 192.168.1.188
INFO:urllib3.connectionpool:Starting new HTTP connection (1): 192.168.1.188
INFO:urllib3.connectionpool:Starting new HTTP connection (1): 192.168.1.188
INFO:urllib3.connectionpool:Starting new HTTP connection (1): 192.168.1.188
ERROR:swiftclient:[Errno 111] Connection refused
Traceback (most recent call last):
File "/usr/lib/python2.6/site-packages/swiftclient/client.py", line 1208, in _retry
rv = func(self.url, self.token, *args, **kwargs)
File "/usr/lib/python2.6/site-packages/swiftclient/client.py", line 448, in get_account
conn.request(method, full_path, '', headers)
File "/usr/lib/python2.6/site-packages/swiftclient/client.py", line 213, in request
files=files, **self.requests_args)
File "/usr/lib/python2.6/site-packages/swiftclient/client.py", line 181, in _request
return self.request_session.request(*arg, **kwarg)
File "/usr/lib/python2.6/site-packages/requests/sessions.py", line 279, in request
resp = self.send(prep, stream=stream, timeout=timeout, verify=verify, cert=cert, proxies=proxies)
File "/usr/lib/python2.6/site-packages/requests/sessions.py", line 374, in send
r = adapter.send(request, **kwargs)
File "/usr/lib/python2.6/site-packages/requests/adapters.py", line 206, in send
raise ConnectionError(sockerr)
ConnectionError: [Errno 111] Connection refused
[Errno 111] Connection refused
I restarted swift by running the following
# swift-init restart all
Signal container-updater pid: 4560 signal: 15
Signal account-auditor pid: 4481 signal: 15
Signal object-replicator pid: 4582 signal: 15
Signal proxy-server pid: 4600 signal: 15
No proxy-server running
Signal container-replicator pid: 4547 signal: 15
Signal object-auditor pid: 4575 signal: 15
No object-expirer running
Signal container-auditor pid: 4529 signal: 15
Signal container-server pid: 4514 signal: 15
No container-server running
Signal account-server pid: 4474 signal: 15
No account-server running
Signal account-reaper pid: 4499 signal: 15
No container-sync running
Signal account-replicator pid: 4506 signal: 15
Signal object-updater pid: 4593 signal: 15
Signal object-server pid: 4567 signal: 15
No object-server running
container-updater (4560) appears to have stopped
account-auditor (4481) appears to have stopped
object-replicator (4582) appears to have stopped
container-replicator (4547) appears to have stopped
object-auditor (4575) appears to have stopped
container-auditor (4529) appears to have stopped
account-replicator (4506) appears to have stopped
account-reaper (4499) appears to have stopped
object-updater (4593) appears to have stopped
Starting container-updater...(/etc/swift/container-server.conf)
Starting account-auditor...(/etc/swift/account-server.conf)
Starting object-replicator...(/etc/swift/object-server.conf)
Starting proxy-server...(/etc/swift/proxy-server.conf)
Starting container-replicator...(/etc/swift/container-server.conf)
Starting object-auditor...(/etc/swift/object-server.conf)
Starting object-expirer...(/etc/swift/object-expirer.conf)
Starting container-auditor...(/etc/swift/container-server.conf)
Starting container-server...(/etc/swift/container-server.conf)
Starting account-server...(/etc/swift/account-server.conf)
Starting account-reaper...(/etc/swift/account-server.conf)
Starting container-sync...(/etc/swift/container-server.conf)
Starting account-replicator...(/etc/swift/account-server.conf)
Starting object-updater...(/etc/swift/object-server.conf)
Starting object-server...(/etc/swift/object-server.conf)
No handlers could be found for logger "swift"
Now log back into dashboard and click "Object Store" -> containers again

swift list is also running fine now.
I tried run debug option with swift command
$ swift --debug list
DEBUG:keystoneclient.session:REQ: curl -i -X POST http://192.168.1.188:5000/v2.0/tokens -H "Content-Type: application/json" -H "Accept: application/json" -H "User-Agent: python-keystoneclient" -d '{"auth": {"tenantName": "admin",
:
:
:
:
:
:
:
INFO:urllib3.connectionpool:Starting new HTTP connection (1): 192.168.1.188
INFO:urllib3.connectionpool:Starting new HTTP connection (1): 192.168.1.188
INFO:urllib3.connectionpool:Starting new HTTP connection (1): 192.168.1.188
INFO:urllib3.connectionpool:Starting new HTTP connection (1): 192.168.1.188
INFO:urllib3.connectionpool:Starting new HTTP connection (1): 192.168.1.188
INFO:urllib3.connectionpool:Starting new HTTP connection (1): 192.168.1.188
ERROR:swiftclient:[Errno 111] Connection refused
Traceback (most recent call last):
File "/usr/lib/python2.6/site-packages/swiftclient/client.py", line 1208, in _retry
rv = func(self.url, self.token, *args, **kwargs)
File "/usr/lib/python2.6/site-packages/swiftclient/client.py", line 448, in get_account
conn.request(method, full_path, '', headers)
File "/usr/lib/python2.6/site-packages/swiftclient/client.py", line 213, in request
files=files, **self.requests_args)
File "/usr/lib/python2.6/site-packages/swiftclient/client.py", line 181, in _request
return self.request_session.request(*arg, **kwarg)
File "/usr/lib/python2.6/site-packages/requests/sessions.py", line 279, in request
resp = self.send(prep, stream=stream, timeout=timeout, verify=verify, cert=cert, proxies=proxies)
File "/usr/lib/python2.6/site-packages/requests/sessions.py", line 374, in send
r = adapter.send(request, **kwargs)
File "/usr/lib/python2.6/site-packages/requests/adapters.py", line 206, in send
raise ConnectionError(sockerr)
ConnectionError: [Errno 111] Connection refused
[Errno 111] Connection refused
I restarted swift by running the following
# swift-init restart all
Signal container-updater pid: 4560 signal: 15
Signal account-auditor pid: 4481 signal: 15
Signal object-replicator pid: 4582 signal: 15
Signal proxy-server pid: 4600 signal: 15
No proxy-server running
Signal container-replicator pid: 4547 signal: 15
Signal object-auditor pid: 4575 signal: 15
No object-expirer running
Signal container-auditor pid: 4529 signal: 15
Signal container-server pid: 4514 signal: 15
No container-server running
Signal account-server pid: 4474 signal: 15
No account-server running
Signal account-reaper pid: 4499 signal: 15
No container-sync running
Signal account-replicator pid: 4506 signal: 15
Signal object-updater pid: 4593 signal: 15
Signal object-server pid: 4567 signal: 15
No object-server running
container-updater (4560) appears to have stopped
account-auditor (4481) appears to have stopped
object-replicator (4582) appears to have stopped
container-replicator (4547) appears to have stopped
object-auditor (4575) appears to have stopped
container-auditor (4529) appears to have stopped
account-replicator (4506) appears to have stopped
account-reaper (4499) appears to have stopped
object-updater (4593) appears to have stopped
Starting container-updater...(/etc/swift/container-server.conf)
Starting account-auditor...(/etc/swift/account-server.conf)
Starting object-replicator...(/etc/swift/object-server.conf)
Starting proxy-server...(/etc/swift/proxy-server.conf)
Starting container-replicator...(/etc/swift/container-server.conf)
Starting object-auditor...(/etc/swift/object-server.conf)
Starting object-expirer...(/etc/swift/object-expirer.conf)
Starting container-auditor...(/etc/swift/container-server.conf)
Starting container-server...(/etc/swift/container-server.conf)
Starting account-server...(/etc/swift/account-server.conf)
Starting account-reaper...(/etc/swift/account-server.conf)
Starting container-sync...(/etc/swift/container-server.conf)
Starting account-replicator...(/etc/swift/account-server.conf)
Starting object-updater...(/etc/swift/object-server.conf)
Starting object-server...(/etc/swift/object-server.conf)
No handlers could be found for logger "swift"
Now log back into dashboard and click "Object Store" -> containers again
swift list is also running fine now.
Tuesday, June 24, 2014
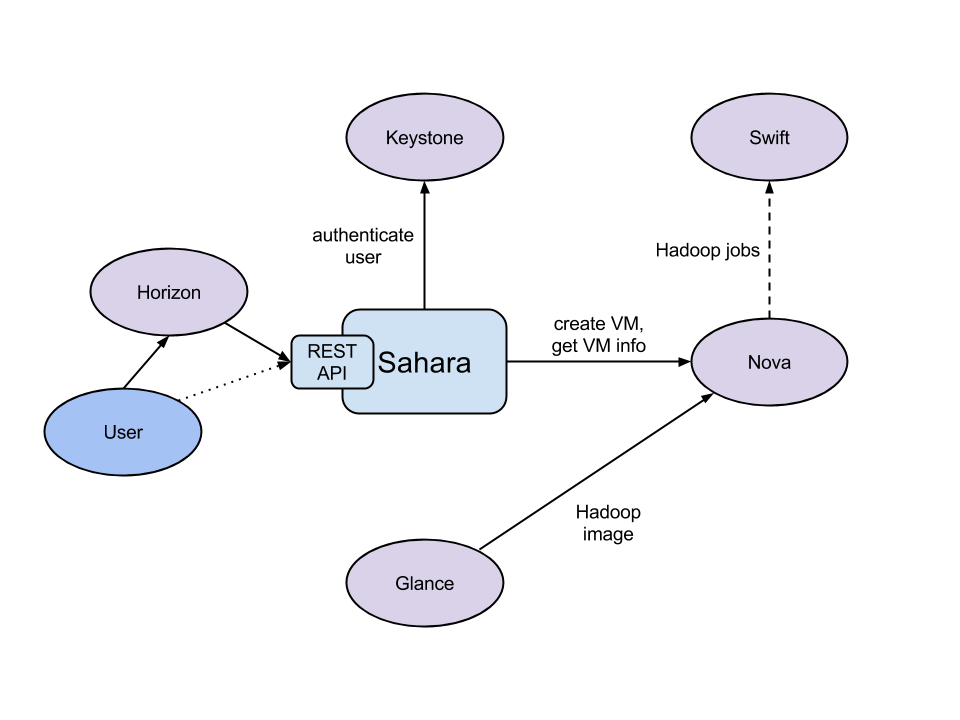
Hadoop meets OpenStack
The Sahara project provides a simple means to provision a Hadoop cluster on top of OpenStack.
https://wiki.openstack.org/wiki/Sahara
http://docs.openstack.org/developer/sahara/architecture.html

http://www.slideshare.net/mirantis/savanna-hadoop-on-openstack
https://www.youtube.com/watch?v=3bI1WjB-5AM
https://wiki.openstack.org/wiki/Sahara
http://docs.openstack.org/developer/sahara/architecture.html
The Sahara architecture consists of several components:
- Auth component - responsible for client authentication & authorization, communicates with Keystone
- DAL - Data Access Layer, persists internal models in DB
- Provisioning Engine - component responsible for communication with Nova, Heat, Cinder and Glance
- Vendor Plugins - pluggable mechanism responsible for configuring and launching Hadoop on provisioned VMs; existing management solutions like Apache Ambari and Cloudera Management Console could be utilized for that matter
- EDP - Elastic Data Processing (EDP) responsible for scheduling and managing Hadoop jobs on clusters provisioned by Sahara
- REST API - exposes Sahara functionality via REST
- Python Sahara Client - similar to other OpenStack components Sahara has its own python client
- Sahara pages - GUI for the Sahara is located on Horizon
http://www.slideshare.net/mirantis/savanna-hadoop-on-openstack
https://www.youtube.com/watch?v=3bI1WjB-5AM
Monday, June 23, 2014
OpenStack Images Project PTL : upcoming updates for Juno
Slides are here
The main focus of Glance was to provide services to store, browse, share, distribute, and manage bootable disk images.
Juno updates of Images : To provide services to store, browse, share, distribute and manage artifacts.
An artifact is strongly-typed versioned data asset, which can include disk image, device layout, machine template, heat template etc.
Sunday, June 22, 2014
OpenStack : Cinder : Create a non-bootable volume and attach the volume to a running instance
Create a non-bootable volume (8G)
$ cinder create --display-name test-vol1 8
+---------------------+--------------------------------------+
| Property | Value |
+---------------------+--------------------------------------+
| attachments | [] |
| availability_zone | nova |
| bootable | false |
| created_at | 2014-06-22T14:48:17.015580 |
| display_description | None |
| display_name | test-vol1 |
| encrypted | False |
| id | 3339503f-b422-489d-81b4-7b9eb245fe42 |
| metadata | {} |
| size | 8 |
| snapshot_id | None |
| source_volid | None |
| status | creating |
| volume_type | None |
+---------------------+--------------------------------------+
$ cinder show test-vol1
+--------------------------------+--------------------------------------+
| Property | Value |
+--------------------------------+--------------------------------------+
| attachments | [] |
| availability_zone | nova |
| bootable | false |
| created_at | 2014-06-22T14:48:17.000000 |
| display_description | None |
| display_name | test-vol1 |
| encrypted | False |
| id | 3339503f-b422-489d-81b4-7b9eb245fe42 |
| metadata | {} |
| os-vol-host-attr:host | novo |
| os-vol-mig-status-attr:migstat | None |
| os-vol-mig-status-attr:name_id | None |
| os-vol-tenant-attr:tenant_id | d40ee1521270498cbd71cbfdbf54a4ff |
| size | 8 |
| snapshot_id | None |
| source_volid | None |
| status | available |
| volume_type | None |
+--------------------------------+--------------------------------------+
Volume is visible via dashboard

$ nova list
+--------------------------------------+---------------+--------+------------+-------------+--------------------------------+
| ID | Name | Status | Task State | Power State | Networks |
+--------------------------------------+---------------+--------+------------+-------------+--------------------------------+
| affcd01a-9669-4b8f-a89c-5152966d8981 | centos-test01 | ACTIVE | - | Running | private=10.0.0.9, 172.24.4.232 |
| 0c84e296-82d1-487b-bb5f-576b4c73607f | fedora-test01 | ACTIVE | - | Running | private=10.0.0.8, 172.24.4.231 |
| c936ede3-4ec6-4e36-8b1e-3c319badc9c5 | jumphost | ACTIVE | - | Running | private=10.0.0.2, 172.24.4.236 |
+--------------------------------------+---------------+--------+------------+-------------+--------------------------------+
$ cinder list
+--------------------------------------+-----------+--------------+------+-------------+----------+-------------+
| ID | Status | Display Name | Size | Volume Type | Bootable | Attached to |
+--------------------------------------+-----------+--------------+------+-------------+----------+-------------+
| 3339503f-b422-489d-81b4-7b9eb245fe42 | available | test-vol1 | 8 | None | false | |
+--------------------------------------+-----------+--------------+------+-------------+----------+-------------+
Now attach this cinder volume to centos instance
usage: nova volume-attach <server> <volume> [<device>]
$ nova volume-attach affcd01a-9669-4b8f-a89c-5152966d8981 3339503f-b422-489d-81b4-7b9eb245fe42
+----------+--------------------------------------+
| Property | Value |
+----------+--------------------------------------+
| device | /dev/vdb |
| id | 3339503f-b422-489d-81b4-7b9eb245fe42 |
| serverId | affcd01a-9669-4b8f-a89c-5152966d8981 |
| volumeId | 3339503f-b422-489d-81b4-7b9eb245fe42 |
+----------+--------------------------------------+
This volume is showing as in-use and attached to an instance.
$ cinder list
+--------------------------------------+--------+--------------+------+-------------+----------+--------------------------------------+
| ID | Status | Display Name | Size | Volume Type | Bootable | Attached to |
+--------------------------------------+--------+--------------+------+-------------+----------+--------------------------------------+
| 3339503f-b422-489d-81b4-7b9eb245fe42 | in-use | test-vol1 | 8 | None | false |affcd01a-9669-4b8f-a89c-5152966d8981 |
+--------------------------------------+--------+--------------+------+-------------+----------+--------------------------------------+
SSH into centos instance and check /var/log/messages
Jun 22 12:59:34 host-10-0-0-9 kernel: vdb: unknown partition table
/dev/vdb is ready for use :
[root@centos-test01 ~]# fdisk -l /dev/vdb
Disk /dev/vdb: 8589 MB, 8589934592 bytes
16 heads, 63 sectors/track, 16644 cylinders
Units = cylinders of 1008 * 512 = 516096 bytes
Sector size (logical/physical): 512 bytes / 512 bytes
I/O size (minimum/optimal): 512 bytes / 512 bytes
Disk identifier: 0x00000000
Rackspace also provided a good tutorial page for this feature. Link
# mkfs.ext3 /dev/vdb
mke2fs 1.41.12 (17-May-2010)
Filesystem label=
OS type: Linux
Block size=4096 (log=2)
Fragment size=4096 (log=2)
Stride=0 blocks, Stripe width=0 blocks
524288 inodes, 2097152 blocks
104857 blocks (5.00%) reserved for the super user
First data block=0
Maximum filesystem blocks=2147483648
64 block groups
32768 blocks per group, 32768 fragments per group
8192 inodes per group
Superblock backups stored on blocks:
32768, 98304, 163840, 229376, 294912, 819200, 884736, 1605632
Writing inode tables: done
Creating journal (32768 blocks): done
Writing superblocks and filesystem accounting information: done
This filesystem will be automatically checked every 38 mounts or
180 days, whichever comes first. Use tune2fs -c or -i to override.
# mkdir /test01
# vi /etc/fstab
/dev/vdb /test01 ext3 defaults 0 0
# mount /test01
Thursday, June 19, 2014
Prepare CentOS image for OpenStack Image Service
Please also refer to here
Download CentOS install ISO file from http://wiki.centos.org/Download
Verify that the libvirt "default" network is active
In my case, it is not active
# virsh net-list
Name State Autostart Persistent
--------------------------------------------------
libvirt has an example default network XML file under /usr/share/libvirt/networks
# cat /usr/share/libvirt/networks/default.xml
<network>
<name>default</name>
<bridge name="virbr0" />
<forward/>
<ip address="192.168.122.1" netmask="255.255.255.0">
<dhcp>
<range start="192.168.122.2" end="192.168.122.254" />
</dhcp>
</ip>
</network>
According to http://wiki.libvirt.org/page/Networking , we can use the following steps to create "default" network :
# virsh net-define /usr/share/libvirt/networks/default.xml
Network default defined from /usr/share/libvirt/networks/default.xml
After running the above command, the following file is created :
# ls -al /etc/libvirt/qemu/networks/default.xml
-rw-------. 1 root root 579 Jun 19 22:51 /etc/libvirt/qemu/networks/default.xml
[root@novo networks]# cat default.xml
<!--
WARNING: THIS IS AN AUTO-GENERATED FILE. CHANGES TO IT ARE LIKELY TO BE
OVERWRITTEN AND LOST. Changes to this xml configuration should be made using:
virsh net-edit default
or other application using the libvirt API.
-->
<network>
<name>default</name>
<uuid>a459e540-d37d-cfb4-99ad-1c846144ac0d</uuid>
<forward mode='nat'/>
<bridge name='virbr0' stp='on' delay='0' />
<mac address='52:54:00:28:C3:B5'/>
<ip address='192.168.122.1' netmask='255.255.255.0'>
<dhcp>
<range start='192.168.122.2' end='192.168.122.254' />
</dhcp>
</ip>
</network>
# virsh net-start default
Network default started
# brctl show
bridge name bridge id STP enabled interfaces
pan0 8000.000000000000 no
qbr24110dfe-84 8000.f21061f22ed8 no qvb24110dfe-84
tap24110dfe-84
qbr426f579f-55 8000.d6804b3332d3 no qvb426f579f-55
tap426f579f-55
virbr0 8000.52540028c3b5 yes virbr0-nic
virbr0 is the bridge for default network
Now default network is active
# virsh net-list
Name State Autostart Persistent
--------------------------------------------------
default active no yes
# qemu-img create -f qcow2 /tmp/centos-6.5.qcow2 10G
Formatting '/tmp/centos-6.5.qcow2', fmt=qcow2 size=10737418240 encryption=off cluster_size=65536
# virt-install --virt-type kvm --name centos-6.5 --ram 1024 --cdrom=/tmp/CentOS-6.5-x86_64-netinstall.iso --disk /tmp/centos-6.5.qcow2,format=qcow2 --network network=default --graphics vnc,listen=0.0.0.0 --noautoconsole --os-type=linux --os-variant=rhel6
Starting install...
Creating domain... | 0 B 00:00
Domain installation still in progress. You can reconnect to
the console to complete the installation process.
Now continue installation on virt-manager
* select IPv4 DHCP
* select URL

Hostname : localhost.localdomain
* select basic server
After installation is done, reject CDROM by running
# virsh attach-disk --type cdrom --mode readonly centos-6.5 "" hdc
Disk attached successfully
# virsh dumpxml centos-6.5 (before and after diff )
< <disk type='file' device='cdrom'>
---
> <disk type='block' device='cdrom'>
32,33c32
< <source file='/tmp/CentOS-6.5-x86_64-netinstall.iso'/>
< <target dev='hdc' bus='ide'/>
---
> <target dev='hdc' bus='ide' tray='open'/>
Now restart
# virsh destroy centos-6.5
Domain centos-6.5 destroyed
# virsh start centos-6.5
Domain centos-6.5 started
The cloud-init package will automatically fetch the public key from the metadata server and place the key in an account. We continue to install the package.
After server is back, login into the server as root.
# rpm -Uvh http://download.fedoraproject.org/pub/epel/6/x86_64/epel-release-6-8.noarch.rpm
Retrieving http://download.fedoraproject.org/pub/epel/6/x86_64/epel-release-6-8.noarch.rpm
warning: /var/tmp/rpm-tmp.ih3yas: Header V3 RSA/SHA256 Signature, key ID 0608b895: NOKEY
Preparing... ########################################### [100%]
1:epel-release ########################################### [100%]
# yum install cloud-init
After installed, vi /etc/cloud/cloud.cfg
remove the following lines :
default_user:
name: cloud-user
Instead, add the following lines : (centos user will be created when OpenStack starts this image, we do not have to create this user manually)
default_user:
name: centos
lock_passwd: true
gecos: Centos Cloud User
groups: [wheel, adm]
sudo: ["ALL=(ALL) NOPASSWD:ALL"]
shell: /bin/bash
Disable the zeroconf route
In order for the instance to access the metadata service, disable the default zeroconf route:
# echo "NOZEROCONF=yes" >> /etc/sysconfig/network
Configure console
vi /boot/grub/grub.conf
add console=ttyS0,115200n8 to the line that begins with kernel
kernel /vmlinuz-2.6.32-431.el6.x86_64 ro
root=/dev/mapper/VolGroup-lv_root rd_NO_LUKS LANG=en_US.UTF-8 rd_NO_MD rd_LVM_LV=VolGroup/lv_swap SYSFONT=latar
cyrheb-sun16 crashkernel=auto rd_LVM_LV=VolGroup/lv_root KEYBOARDTYPE=pc KEYTABLE=us
console=ttyS0,115200n8 rd_NO_DM rhgb quiet
Shutdown the instance
# /sbin/shutdown -h now
Clean up
There is a utility called virt-sysprep, that performs various cleanup tasks such as removing the MAC address references. It will clean up a virtual machine image in place
# virt-sysprep -d centos-6.5
Examining the guest ...
Performing "yum-uuid" ...
Performing "utmp" ...
Performing "udev-persistent-net" ...
Performing "sssd-db-log" ...
Performing "ssh-userdir" ...
Performing "ssh-hostkeys" ...
Performing "smolt-uuid" ...
Performing "script" ...
Performing "samba-db-log" ...
Performing "rpm-db" ...
Performing "rhn-systemid" ...
Performing "random-seed" ...
Performing "puppet-data-log" ...
Performing "pam-data" ...
Performing "package-manager-cache" ...
Performing "pacct-log" ...
Performing "net-hwaddr" ...
Performing "net-hostname" ...
Performing "mail-spool" ...
Performing "machine-id" ...
Performing "logfiles" ...
Performing "hostname" ...
Performing "firstboot" ...
Performing "dovecot-data" ...
Performing "dhcp-server-state" ...
Performing "dhcp-client-state" ...
Performing "cron-spool" ...
Performing "crash-data" ...
Performing "blkid-tab" ...
Performing "bash-history" ...
Performing "abrt-data" ...
Performing "lvm-uuids" ...
# virsh undefine centos-6.5
Domain centos-6.5 has been undefined
Now /tmp/centos-6.5.qcow2 is ready for uploading to the OpenStack Image Service.


After this image is uploaded to OpenStack and then we can start an instance.

Now try to connect to this instance.
$ ssh centos@172.24.4.232
The authenticity of host '172.24.4.232 (172.24.4.232)' can't be established.
RSA key fingerprint is b5:4a:5c:c8:9e:e9:63:19:65:b0:80:6c:ab:be:20:08.
Are you sure you want to continue connecting (yes/no)? yes
Warning: Permanently added '172.24.4.232' (RSA) to the list of known hosts.
[centos@centos-test01 ~]$
Download CentOS install ISO file from http://wiki.centos.org/Download
Verify that the libvirt "default" network is active
In my case, it is not active
# virsh net-list
Name State Autostart Persistent
--------------------------------------------------
libvirt has an example default network XML file under /usr/share/libvirt/networks
# cat /usr/share/libvirt/networks/default.xml
<network>
<name>default</name>
<bridge name="virbr0" />
<forward/>
<ip address="192.168.122.1" netmask="255.255.255.0">
<dhcp>
<range start="192.168.122.2" end="192.168.122.254" />
</dhcp>
</ip>
</network>
According to http://wiki.libvirt.org/page/Networking , we can use the following steps to create "default" network :
# virsh net-define /usr/share/libvirt/networks/default.xml
Network default defined from /usr/share/libvirt/networks/default.xml
After running the above command, the following file is created :
# ls -al /etc/libvirt/qemu/networks/default.xml
-rw-------. 1 root root 579 Jun 19 22:51 /etc/libvirt/qemu/networks/default.xml
[root@novo networks]# cat default.xml
<!--
WARNING: THIS IS AN AUTO-GENERATED FILE. CHANGES TO IT ARE LIKELY TO BE
OVERWRITTEN AND LOST. Changes to this xml configuration should be made using:
virsh net-edit default
or other application using the libvirt API.
-->
<network>
<name>default</name>
<uuid>a459e540-d37d-cfb4-99ad-1c846144ac0d</uuid>
<forward mode='nat'/>
<bridge name='virbr0' stp='on' delay='0' />
<mac address='52:54:00:28:C3:B5'/>
<ip address='192.168.122.1' netmask='255.255.255.0'>
<dhcp>
<range start='192.168.122.2' end='192.168.122.254' />
</dhcp>
</ip>
</network>
# virsh net-start default
Network default started
# brctl show
bridge name bridge id STP enabled interfaces
pan0 8000.000000000000 no
qbr24110dfe-84 8000.f21061f22ed8 no qvb24110dfe-84
tap24110dfe-84
qbr426f579f-55 8000.d6804b3332d3 no qvb426f579f-55
tap426f579f-55
virbr0 8000.52540028c3b5 yes virbr0-nic
virbr0 is the bridge for default network
Now default network is active
# virsh net-list
Name State Autostart Persistent
--------------------------------------------------
default active no yes
# qemu-img create -f qcow2 /tmp/centos-6.5.qcow2 10G
Formatting '/tmp/centos-6.5.qcow2', fmt=qcow2 size=10737418240 encryption=off cluster_size=65536
# virt-install --virt-type kvm --name centos-6.5 --ram 1024 --cdrom=/tmp/CentOS-6.5-x86_64-netinstall.iso --disk /tmp/centos-6.5.qcow2,format=qcow2 --network network=default --graphics vnc,listen=0.0.0.0 --noautoconsole --os-type=linux --os-variant=rhel6
Starting install...
Creating domain... | 0 B 00:00
Domain installation still in progress. You can reconnect to
the console to complete the installation process.
Now continue installation on virt-manager
* select IPv4 DHCP
* select URL
Hostname : localhost.localdomain
* select basic server
After installation is done, reject CDROM by running
# virsh attach-disk --type cdrom --mode readonly centos-6.5 "" hdc
Disk attached successfully
# virsh dumpxml centos-6.5 (before and after diff )
< <disk type='file' device='cdrom'>
---
> <disk type='block' device='cdrom'>
32,33c32
< <source file='/tmp/CentOS-6.5-x86_64-netinstall.iso'/>
< <target dev='hdc' bus='ide'/>
---
> <target dev='hdc' bus='ide' tray='open'/>
Now restart
# virsh destroy centos-6.5
Domain centos-6.5 destroyed
# virsh start centos-6.5
Domain centos-6.5 started
The cloud-init package will automatically fetch the public key from the metadata server and place the key in an account. We continue to install the package.
After server is back, login into the server as root.
# rpm -Uvh http://download.fedoraproject.org/pub/epel/6/x86_64/epel-release-6-8.noarch.rpm
Retrieving http://download.fedoraproject.org/pub/epel/6/x86_64/epel-release-6-8.noarch.rpm
warning: /var/tmp/rpm-tmp.ih3yas: Header V3 RSA/SHA256 Signature, key ID 0608b895: NOKEY
Preparing... ########################################### [100%]
1:epel-release ########################################### [100%]
# yum install cloud-init
After installed, vi /etc/cloud/cloud.cfg
remove the following lines :
default_user:
name: cloud-user
Instead, add the following lines : (centos user will be created when OpenStack starts this image, we do not have to create this user manually)
default_user:
name: centos
lock_passwd: true
gecos: Centos Cloud User
groups: [wheel, adm]
sudo: ["ALL=(ALL) NOPASSWD:ALL"]
shell: /bin/bash
Disable the zeroconf route
In order for the instance to access the metadata service, disable the default zeroconf route:
# echo "NOZEROCONF=yes" >> /etc/sysconfig/network
Configure console
vi /boot/grub/grub.conf
add console=ttyS0,115200n8 to the line that begins with kernel
kernel /vmlinuz-2.6.32-431.el6.x86_64 ro
root=/dev/mapper/VolGroup-lv_root rd_NO_LUKS LANG=en_US.UTF-8 rd_NO_MD rd_LVM_LV=VolGroup/lv_swap SYSFONT=latar
cyrheb-sun16 crashkernel=auto rd_LVM_LV=VolGroup/lv_root KEYBOARDTYPE=pc KEYTABLE=us
console=ttyS0,115200n8 rd_NO_DM rhgb quiet
Shutdown the instance
# /sbin/shutdown -h now
Clean up
There is a utility called virt-sysprep, that performs various cleanup tasks such as removing the MAC address references. It will clean up a virtual machine image in place
# virt-sysprep -d centos-6.5
Examining the guest ...
Performing "yum-uuid" ...
Performing "utmp" ...
Performing "udev-persistent-net" ...
Performing "sssd-db-log" ...
Performing "ssh-userdir" ...
Performing "ssh-hostkeys" ...
Performing "smolt-uuid" ...
Performing "script" ...
Performing "samba-db-log" ...
Performing "rpm-db" ...
Performing "rhn-systemid" ...
Performing "random-seed" ...
Performing "puppet-data-log" ...
Performing "pam-data" ...
Performing "package-manager-cache" ...
Performing "pacct-log" ...
Performing "net-hwaddr" ...
Performing "net-hostname" ...
Performing "mail-spool" ...
Performing "machine-id" ...
Performing "logfiles" ...
Performing "hostname" ...
Performing "firstboot" ...
Performing "dovecot-data" ...
Performing "dhcp-server-state" ...
Performing "dhcp-client-state" ...
Performing "cron-spool" ...
Performing "crash-data" ...
Performing "blkid-tab" ...
Performing "bash-history" ...
Performing "abrt-data" ...
Performing "lvm-uuids" ...
# virsh undefine centos-6.5
Domain centos-6.5 has been undefined
Now /tmp/centos-6.5.qcow2 is ready for uploading to the OpenStack Image Service.
After this image is uploaded to OpenStack and then we can start an instance.
Now try to connect to this instance.
$ ssh centos@172.24.4.232
The authenticity of host '172.24.4.232 (172.24.4.232)' can't be established.
RSA key fingerprint is b5:4a:5c:c8:9e:e9:63:19:65:b0:80:6c:ab:be:20:08.
Are you sure you want to continue connecting (yes/no)? yes
Warning: Permanently added '172.24.4.232' (RSA) to the list of known hosts.
[centos@centos-test01 ~]$
Monday, June 16, 2014
Big Data Computations Using Elastic Data Processing in OpenStack Cloud
Sahara architecture provides a scalable data processing stack.
https://www.youtube.com/watch?v=-5i_mFwuYKw
http://docs.openstack.org/developer/sahara/architecture.html

Slides can be found here :
http://www.slideshare.net/lukjanovsv/pdf-34637468
- provision and operate Hadoop clusters
- schedule and operate Hadoop jobs
https://www.youtube.com/watch?v=-5i_mFwuYKw
http://docs.openstack.org/developer/sahara/architecture.html
Slides can be found here :
http://www.slideshare.net/lukjanovsv/pdf-34637468
Friday, June 13, 2014
Overview of the Lambda Architecture
Source :
http://www.mapr.com/fr/developercentral/lambda-architecture
The Lambda Architecture as seen in the picture has three major components.
http://www.mapr.com/fr/developercentral/lambda-architecture
The Lambda Architecture as seen in the picture has three major components.
- Batch layer that provides the following functionality
- managing the master dataset, an immutable, append-only set of raw data
- pre-computing arbitrary query functions, called batch views.
- managing the master dataset, an immutable, append-only set of raw data
- Serving layer—This layer indexes the batch views so that they can be queried in ad hoc with low latency.
- Speed layer—This layer accommodates all requests that are subject to low latency requirements. Using fast and incremental algorithms, the speed layer deals with recent data only.Each of these layers can be realized using various big data technologies. For instance, the batch layer datasets can be in a distributed filesystem, while MapReduce can be used to create batch views that can be fed to the serving layer. The serving layer can be implemented using NoSQL technologies such as HBase, while querying can be implemented by technologies such as Apache Drill or Impala. Finally, the speed layer can be realized with data streaming technologies such as Apache Storm or Spark Streaming.
Setup gateway, static IP and SSH for Brocade Vyatta vRouter
Login as vyatta
$ configure
# set system gateway-address 192.168.1.1
# set interfaces ethernet eth0 address 192.168.1.186/24
# commit
# save
# exit
$ reboot

Now setup SSH
Login as vyatta
$ configure
# set service ssh
# commit
# save
# exit

Now we can run ssh from other server and connect into the Brocade Vyatta vRouter :
[openstack@novo ~]$ ssh vyatta@192.168.1.186
The authenticity of host '192.168.1.186 (192.168.1.186)' can't be established.
RSA key fingerprint is 60:37:ea:15:b3:3e:58:f5:7b:16:80:5f:ad:d9:4e:bd.
Are you sure you want to continue connecting (yes/no)? yes
Warning: Permanently added '192.168.1.186' (RSA) to the list of known hosts.
Welcome to Vyatta
vyatta@192.168.1.186's password:
Welcome to Vyatta
Version: VSE6.6R5S1
Description: Brocade Vyatta 5410 vRouter 6.6 R5S1
Copyright: 2006-2014 Vyatta, Inc.
Last login: Fri Jun 13 20:05:55 2014
vyatta@vyatta:~$
$ configure
# set system gateway-address 192.168.1.1
# set interfaces ethernet eth0 address 192.168.1.186/24
# commit
# save
# exit
$ reboot
Now setup SSH
Login as vyatta
$ configure
# set service ssh
# commit
# save
# exit
Now we can run ssh from other server and connect into the Brocade Vyatta vRouter :
[openstack@novo ~]$ ssh vyatta@192.168.1.186
The authenticity of host '192.168.1.186 (192.168.1.186)' can't be established.
RSA key fingerprint is 60:37:ea:15:b3:3e:58:f5:7b:16:80:5f:ad:d9:4e:bd.
Are you sure you want to continue connecting (yes/no)? yes
Warning: Permanently added '192.168.1.186' (RSA) to the list of known hosts.
Welcome to Vyatta
vyatta@192.168.1.186's password:
Welcome to Vyatta
Version: VSE6.6R5S1
Description: Brocade Vyatta 5410 vRouter 6.6 R5S1
Copyright: 2006-2014 Vyatta, Inc.
Last login: Fri Jun 13 20:05:55 2014
vyatta@vyatta:~$
Brocade Vyatta vRouter Software Installation
I used Oracle VirtualBox as VM for Brocade Vyatta vRouter Software Installation.
System requirements :
Minimum 512MB memory
Minumum 2GB disk space
Here are the settings in VirtualBox :
Click New


Click Settings -> Network


Click Storage -> Add DVD device
Select file vyatta-livecd_VSE6.6R5S1_amd64.iso
This file was downloaded from Brocade as 60-day free trial.

Now Click Start


Default login / password is vyatta / vyatta

install system


Select destination drive


Copying system files
and then
Copying configuration file to /config/config.boot

Set the administrator password

Installing the GRUB boot loader

reboot

We need to remove the virtual DVD to avoid booting from the LiveCD ISO file.
click Settings -> Storage -> Remove disk from virtual drive (remove the ISO file)


After the login promt is back, login as vyatta again.
$ show version

$ show configuration
We can see eth0 and eth1

System requirements :
Minimum 512MB memory
Minumum 2GB disk space
Here are the settings in VirtualBox :
Click New
Click Settings -> Network
Click Storage -> Add DVD device
Select file vyatta-livecd_VSE6.6R5S1_amd64.iso
This file was downloaded from Brocade as 60-day free trial.
Default login / password is vyatta / vyatta
install system
Select destination drive
Copying system files
and then
Copying configuration file to /config/config.boot
Set the administrator password
Installing the GRUB boot loader
reboot
We need to remove the virtual DVD to avoid booting from the LiveCD ISO file.
click Settings -> Storage -> Remove disk from virtual drive (remove the ISO file)
After the login promt is back, login as vyatta again.
$ show version
$ show configuration
We can see eth0 and eth1
Monday, June 9, 2014
Automated Deployment of a Highly Available OpenStack Cloud
Automated Deployment of a Highly Available OpenStack Cloud
https://www.youtube.com/watch?v=wu4TsaJQ_fg
https://github.com/aspiers/openstacksummit2014-atlanta
https://www.youtube.com/watch?v=wu4TsaJQ_fg
https://github.com/aspiers/openstacksummit2014-atlanta
Thursday, June 5, 2014
Wonderful data science event hosted by JP Morgan Chase
Tonight I joined a wonderful data science event hosted by JP Morgan Chase.
http://www.meetup.com/New-York-Data-Science-Meetup-hosted-by-JP-Morgan-Chase/events/183905002/


I am in the photo.

http://www.meetup.com/New-York-Data-Science-Meetup-hosted-by-JP-Morgan-Chase/events/183905002/
I am in the photo.
Subscribe to:
Posts (Atom)